Advanced SMILEing
Screen Placement of Visual States
In SMILE, any state that displays something to the screen is known as
a VisualState. These states share the ability to set
their size, position, and relative position to each other. Every visual state
has the following basic attributes, and all of the following attributes can be
passed into the initialization of the visual states in your code:
- width
- height
- x
- y
Now, imagine a scenario where one would want to place a Label
400 pixels above a TextInput, which is 200 pixels to the left
of the bottom right hand corner of the screen. Hard calculations of those numbers by hand or
relativistic positioning attributes could be employed to yield the answer.
By utilizing the relative position attributes, the VisualStates can be initialized to the left or right, above or below, of each other. An example of this is as follows:
1 2 3 4 5 6 7 8 9 10 11 | from smile.common import *
exp = Experiment()
with Parallel():
lb1 = Label(text="I AM NEAR THE BOTTOM", right=exp.screen.right - 200,
bottom=exp.screen.bottom, duration=5)
lb2 = Label(text="I AM ABOVE THE OTHER LABEL", right=lb1.right,
bottom=lb1.top + 400, duration=5)
exp.run()
|
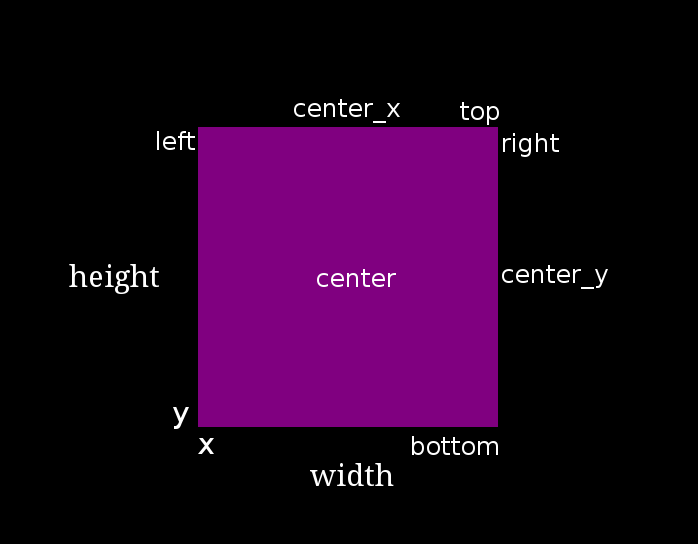
In the above example, the right attribute of the visual states is used as both initialization parameters and attributes. This can be accessed from one state and applied to the next. We also used the attribute bottom which works the exact same way. The following are a list of all the attributes that are in terms of x, y, width, and height:
- bottom : y
- top : y + height
- left : x
- right : x + width
- center_x : (x + width) / 2
- center_y : (y + height) / 2
Multiple of these can be combined together to access a tuple value that contains both pieces of information. These combined attributes are listed below in terms of x, y, width, and height:
- center : ((x + width) / 2, (y + height) / 2)
- center_top : ((x + width) / 2, y + height)
- center_bottom : ((x + width) / 2, y)
- left_center : (x, (y + height) / 2)
- left_bottom : (x, y)
- left_top : (x, y + height)
- right_center : (x + width, (y + height) / 2)
- right_bottom : (x + width, y)
- right_top : (x + width, y + height)
Extending Smile
There may be cases where SMILE lacks functionality needed to run an experiment
properly. Several different methods can be employed to extend SMILE’s functionality.
The first method is Subroutine, which is a section of state machine code that can
be run at several different points in an experiment, similar to a function. The
second is referred to as Wrapping Widgets. Any widgets written and defined in
Kivy can be wrapped into a SMILE WidgetState.
Defining Subroutines
In SMILE, there exists special states called Subroutines.
Subroutines are special states that contain small chunks of state machine code
that the main experiment will need to run over and over again. Like a function,
a Subroutine is defined with the python def followed by the name of the
Subroutine. In SMILE, it is proper practice to name any state with the first
letter of every word a capital letter.
Note
Please note that Subroutines should only be used as self contained snipits of state-machine. Only write a subroutine if the section of state-machine you are trying to replicate would rely only on the parameters passed into it. You should never try to change the value of a parameter inside the Subroutine from outside the Subroutine. However, you have read-only access to any variable set using the self reference explained below. If you would like to have access to the height of a Label inside your subroutine outside your subroutine, you must set self variable to the Height of your Label during Experimental Build Time.
The following is an example on how to define a Subroutine that displays a Label
that will display a number that counts up from a passed in minimum number.
In the subroutine file (test_sub.py), first import all of SMILE’s common states:
from smile.common import *
Warning
Be advised, the above line does not always give every necessary state for an experiment, just the States that are available on every platform.
Next, the definition line needs to be written for the subroutine:
@Subroutine
def CountUpFrom(self, minVal):
First, notice the @Subroutine. This allows CountUpFrom to be a subclass of Subroutine, the general subroutine state.
Note
Please note the self as the first argument passed into a subroutine. If self is not passed, SMILE will throw an error. Please remember to pass in self as the first parameter when defining a subroutine.
Now we can write state machine code for the Subroutine:
from smile.common import *
@Subroutine
def CountUpFrom(self, minVal):

    # Initialize counter, Creates a Set state
    # and sets the variable at Experimental Runtime.
    # After this line, self.counter is a reference object
    # that can be reference anywhere else in this subroutine.
    self.counter = minVal
    # Define the Loop, loop 100 times
    with Loop(100):
        # Apply the plus-equals operator to
        # self.counter to add 5
        self.counter += 5
        # Display the reference self.counter in
        # string form. Ref(str, self.counter) is required
        # to apply the str() function to self.counter during
        # Experimental Runtime instead of Buildtime
        Label(text=Ref(str,self.counter), duration=.2)
Warning
When writting a Subroutine, you can only use SMILE States. A Subroutine will only run any general pythonic code ONCE when the Subroutine is first built during Experimental Build Time. It is best practice to only use SMILE states, sets, and gets during in a Subroutine. If you need to run some kind of complex function in order to run your subroutine, use the Func state to run a function during Experimental Run Time.
Notice self.counter, it creates a Set
state that will set a new attribute to the Subroutine called counter and
will initialize it to minVal during
:ref:`Experimental Runtime <run_build_time>`_.
Anything initialized with the self. will be able to be accessed from outside of the Subroutine. If the above Subroutine is used as an example, the Subroutine as cup = CountUpFrom() can be initialized and cup.counter can be called to get at the value of the counter.
The following is an example of calling this subroutine during an actual experiment:
from smile.common import *

from countup import CountUpFrom

exp = Experiment()

# Just like writing any other state declaration
cuf = CountUpFrom(10)
# Print out the value of the counter in CountUpFrom
# To the command line
Debug(name="Count Up Stuff", end_counter=cuf.counter)

exp.run()
Wrapping Kivy Widgets
Currently, most of the visual states in SMILE are wrapped Kivy widgets.
Rectangle, Image, and
Video are all examples of Kivy widgets that were
wrapped in the video.py code and turned into
WidgetStates.
if there is a desired function that SMILE can’t performed using pre-written
states, and the function cannot be created by writing a
Subroutine, Kivy widgets can be written to achieve this
functionality. To write a Kivy widget for SMILE, the knowledge of the SMILE
backend and Kivy is needed. This section is only for those who want to write
their own widgets!
The My First Widget<https://kivy.org/docs/tutorials/firstwidget.html> gives a thorough examination on how to create a very basic Kivy widget and display it on a Kivy app. This also provides sufficient start on how to create a Kivy widget.
For following example, dotbox.py will be examined. A program was written to produce tiny dots on the screen in an area. The most efficient way accomplish this is through the creation of a Kivy widget.
Here is the definition of our DotBox:
@WidgetState.wrap
class DotBox(Widget):
    """Display a box filled with random square dots.

    Parameters
    ----------
    num_dots : integer
        Number of dots to draw
    pointsize : integer
        Radius of dot (see *Point*)
    color : tuple or string
        Color of dots
    backcolor : tuple or string
        Color of background rectangle

    """

    # Define the widget Parameters for Kivy
    color = ListProperty([1, 1, 1, 1])
    backcolor = ListProperty([0, 0, 0, 0])
    num_dots = NumericProperty(10)
    pointsize = NumericProperty(5)
In DotBox several different parameters are needed to be passed into the __init__ method in order to create different kinds of DotBoxes.
- Color : A list of float values that represent the RGBA of the dots
- backcolor : A list of float values that represent the RGBA of the background
- num_dots : The number of random dots to generate
- pointsize : How big to draw the dots, pointsize by pointsize squares in pixels
Next, the ‘__init__’ method is declared for our ‘DotBox’ widget:
def __init__(self, **kwargs):
    super(type(self), self).__init__(**kwargs)

    # Initialize variables for Kivy
    self._color = None

    self._backcolor = None

    self._points = None

    # Bind the variables to the widget
    self.bind(color=self._update_color,
              backcolor=self._update_backcolor,
              pos=self._update,
              size=self._update,
              num_dots=self._update_locs)

    # Call update_locs() to initialize the
    # point locations
    self._update_locs()
The .bind() method will bind each different attribute of the dot box to a
method callback that might want to run if any of those attributes change.
An example of this is if, in SMILE, an UpdateWidget
state is created where it updates a DotBox attribute, e.g. num_dots attribute.
The attribute change will cause Kivy to callback the corresponding function
attached with .bind(). Now the functions can be defined:
# Update self._color.rgba
def _update_color(self, *pargs):
    self._color.rgba = self.color

# Update self._backcolor.rgba
def _update_backcolor(self, *pargs):
    self._backcolor.rgba = self.backcolor

# Update the locations of the dots, then
# Call self._update() to redraw
def _update_locs(self, *pargs):
    self._locs = [random.random()
                  for i in xrange(int(self.num_dots)*2)]
    self._update()

# Update the size of all of the dots
def _update_pointsize(self, *pargs):
    self._points.pointsize = self.pointsize

# Draw the points onto the Kivy Canvas
def _update(self, *pargs):
    # calc new point locations
    bases = (self.x+self.pointsize, self.y+self.pointsize)
    scales = (self.width-(self.pointsize*2),
              self.height-(self.pointsize*2))
    points = [bases[i % 2]+scales[i % 2]*loc
              for i, loc in enumerate(self._locs)]

    # draw them
    self.canvas.clear()
    with self.canvas:
        # set the back color
        self._backcolor = Color(*self.backcolor)
        # draw the background
        Rectangle(size=self.size,
                  pos=self.pos)
        # set the color
        self._color = Color(*self.color)
        # draw the points
        self._points = Point(points=points, pointsize=self.pointsize)
Any visual widget created in Kivy will require some kind of drawing to the canvas. In the above example, the line with self.canvas was used to define the area in which calls to the graphics portion of Kivy were made, kivy.graphics. The color of what to be drawn was set, then it was drawn. For example, Color() sets the draw color, then Rectangle() tells kivy.graphics to draw a rectangle of that color to the screen.
Since this Widget defined in Kivy will be wrapped with a WidgetState, it can be assumed that this widget will have access to arguments like self.pos, self.size, and obviously arguments like self.x, self.y, self.width, self.height.
dotbox.py in Full
@WidgetState.wrap
class DotBox(Widget):
    """Display a box filled with random square dots.

    Parameters
    ----------
    num_dots : integer
        Number of dots to draw
    pointsize : integer
        Radius of dot (see *Point*)
    color : tuple or string
        Color of dots
    backcolor : tuple or string
        Color of background rectangle

    """
    color = ListProperty([1, 1, 1, 1])
    backcolor = ListProperty([0, 0, 0, 0])
    num_dots = NumericProperty(10)
    pointsize = NumericProperty(5)

    def __init__(self, **kwargs):
        super(type(self), self).__init__(**kwargs)

        self._color = None
        self._backcolor = None
        self._points = None

        self.bind(color=self._update_color,
                  backcolor=self._update_backcolor,
                  pos=self._update,
                  size=self._update,
                  num_dots=self._update_locs)
        self._update_locs()

    def _update_color(self, *pargs):
        self._color.rgba = self.color

    def _update_backcolor(self, *pargs):
        self._backcolor.rgba = self.backcolor

    def _update_locs(self, *pargs):
        self._locs = [random.random()
                      for i in xrange(int(self.num_dots)*2)]
        self._update()

    def _update_pointsize(self, *pargs):
        self._points.pointsize = self.pointsize

    def _update(self, *pargs):
        # calc new point locations
        bases = (self.x+self.pointsize, self.y+self.pointsize)
        scales = (self.width-(self.pointsize*2),
                  self.height-(self.pointsize*2))
        points = [bases[i % 2]+scales[i % 2]*loc
                  for i, loc in enumerate(self._locs)]

        # draw them
        self.canvas.clear()
        with self.canvas:
            # set the back color
            self._backcolor = Color(*self.backcolor)

            # draw the background
            Rectangle(size=self.size,
                      pos=self.pos)

            # set the color
            self._color = Color(*self.color)

            # draw the points
            self._points = Point(points=points, pointsize=self.pointsize)
Setting a variable in RT
Like it is stated in Build Time VS Run Time, in order to set a variable in SMILE during RT, the exp.variable_name syntax must be used. In this section, the results of calling ‘exp.variable_name’ in SMILE will be examined.
The following is a sample experiment where exp.display_me is set to a string:
from smile.common import *

exp = Experiment()

exp.display_me = "LETS DISPLAY THIS SECRET MESSAGE"
Label(text=exp.display_me)

exp.run()
This is a very simple experiment. It must be understood that
exp.display_me = “LETS DISPLAY THIS SECRET MESSAGE” creates a
Set state. A Set state takes a string
var_name that refers to a variable in an Experiment or to a newly created
variable, and a value that refers to the value that the variable is assigned
to take on. The important takeaway is that ‘value’ can be referenced to a value.
If ‘value’ is a reference, it will be evaluated during RT. Below is an
example of what the experiment would look like if the 3rd line is changed:
from smile.common import *

exp = Experiment()

Set(var_name="display_me", value="LETS DISPLAY THIS SECRET MESSAGE")
Label(text=exp.display_me)

exp.run()
Both sample experiments run the exact same way, but the only difference is how
the code looks to the end user. The Set state is untimed, so it changes the
value of the variable immediately at enter. For more information look at the
docstring for Set and the code behind the
smile.experiment.Experiment.set_var() method.
Performing Operations and Functions in RT
Until this point, new methods that run during RT have not run correctly. In this section, examining why this happens and correcting this issue will be discussed.
Since every SMILE experiment is separated into BT and RT, any calls to
functions or methods without using the proper SMILE syntax will run in BT
and not RT. In order to run a function or method, a
Ref or a Func is needed to be
used. As stated in The Reference Section of the state machine
document, a Ref is a delayed function call.
When it is desired to pass in the return value of a function to a SMILE state as a parameter, it is appropriate use Ref. The first parameter for a Ref call is always the function desired to run, and the other parameter to that function call are the rest of the parameters to the Ref.
Below is an example of a loop that displays the counter of the loop in a label
on the center of the screen. Since the Loop counter is
an integer, the integer must first be changed to a string. This can be performed
by creating a Ref to call ‘str()’.
with Loop(100) as lp:
    #This Ref is a delayed function call to str where
    #one of the parameters is a reference. Ref also
    #takes care of evaluating references.
    Label(text=Ref(str, lp.i), duration=0.2)
To run a function during RT the Func state is needed. Func creates a state that will not run the passed in function call until the previous state leaves. The following is an example of using a Func to generate the next set of stimulus for each iteration of a Loop. To access the return value of a method or function call, the .result attribute of the Func state must be accessed.
#Assume DisplayStim is a predefined Subroutine
#that displays a list of stimulus, and assume that
#gen_stim is a predefined function that generates
#that stimulus
with Loop(10) as lp:
    stim = Func(gen_stim, length=lp.i)
    DisplayStim(stim.result, duration=5)
Note
Remember that you can pass in keyword arguments AND regular arguments into both Func states and Ref calls.
Effective timing of KeyPress
In order to increase the effectiveness of a KeyPress state, you can set a base_time parameter. A KeyPress will calculate the reaction time, or rt, by subtracting the base_time from the press_time. If no base_time is passed in as a paramter to KeyPress, SMILE will set the base_time to the KeyPresses start_time.
When you want someone to press a button immediately after they see a stimulus, you need to set the base_time as the appear_time[‘time’]. See an example of this below.
press = Label(text="Press NOW!")
with UntilDone():
    Wait(min_response_time)
    kp = KeyPress(base_time=press.appear_time['time'])
When you want a participant to press a button immediately after they see a stimulus disappear off the screen, you need to set the base_time as the disappear_time[‘time’]. See an example of this below.
press = Label(ext="Press When I Disappear", duration=2.0)
Wait(until=press.disappear_time)
kp = KeyPress(base_time=press.disappear_time['time'])
Timing the Screen Refresh VS Timing Inputs
Before examining this section, it is important to understand how SMILE displays each frame of your experiment. SMILE runs on a two buffer system, where when a frame is being prepared, it is drawn to a back buffer. When everything is drawn and/or ready, the back buffer is flipped to the front buffer, then the back buffer is cleared to get ready for more drawing.
The following is a detailed example: an experiment wants to display
a new Label onto the screen. The first thing SMILE does
is draw the Label onto the back buffer, then calls for a Blocking Flip. A
Blocking Flip is when SMILE waits for everything to be finished writing to
the screen, then flips the next time it passes through the event loop if it is
around the flip interval. Then SMILE flips into NonBlocking Flip Mode. In
this mode, SMILE will try and flip the buffer as soon as anything changes.
SMILE switches to this mode to allow Kivy to update the screen whenever it needs
to. The other time in a Visual State’s lifespan where SMILE calls for a
Blocking Flip is when it disappears from the screen. SMILE uses
Blocking Flips for the appearance and disappearance of a VisualState to
accurately track the timing of those two events.
In SMILE, the end user can force the 2 different modes of updating the screen
using BlockingFlip and
NonBlockingFlip. They both are important, for they both
grant the ability to prioritize different aspects of an experiment, input or
output, when it comes to timing things as accurately as possible.
A NonBlockingFlip is used when the timing of visual stimulus isn’t the most important. If SMILE is forced into this mode, timing of input can be made much more accurate, like mouse and keyboard. SMILE can be forced into NonBlockingFlips by putting this state in parallel with what is desired to run in NonBlockingFlip Mode.
The following is a mini example of such a Parallel:
with Parallel() as p:
    NonBlockingFlip()
    lb = Label(text="PRESS NOW!!!")
    with UntilDone():
        Wait(until=lb.appear_time)
        kp = KeyPress(base_time = lb.appear_time['time'])
A BlockingFlip is used when the timing of screen appearance takes priority
over when the timing of inputs occur. Using this mode, the changes in exp._last_flip
can be Record.
An example of this is as follows:
with Parallel():
    BlockingFlip()
    vd = Video(source="test_vid.mp4")
    Record(name="video_record", flip=exp._last_flip)
Information for SMILE Developers
Below will be several sections that better explain all of the intricacies of SMILE’s backend. Look at this section only if you are interested in creating your own states, or better understanding how SMILE does what it does.
The States of a State
Every state in SMILE runs through 6 main function calls. These function calls are automatic and never need to be called by the end user, but it is important to understand what they do and when they do it to fully understand SMILE. These function calls are __init__, .enter(), .start(), .end(), .leave(), and .finalize(). Each of these calls happen at different parts of the experiment, and have different functions depending on the subclass.
.__init__ happens during BT and is the only one to happen at BT. This function usually sets up all of the references, processes some of the parameters, and knows what to do if a parameter is missing or wasn’t passed in.
.enter() happens during RT and will be called after the previous state calls .leave(). This function will evaluate all of the parameters that were references, and set all the values of the remaining parameters. It will also schedule a start time for this state.
.start() is a class of function calls that, during RT, the state starts
doing whatever makes it special. This function is not always called .start().
In the case of an Image state, .start() is replaced
with .appear(). The .start() functions could do anything from showing an
image to recording a keypress. After .start() this state will begin actually
performing its main function.
Note
A .start() kind of call will only exist in an Action State (see below).
.end() is a class of function calls that, during RT, ends whatever makes the state special. In the case of an Image, .end() is replaced with .disappear(). After .end(), .leave() is available to be called.
Note
A .end() kind of call will only exist in an Action State (see below).
.leave() happens during RT and will be called whenever the duration of a state is over, or whenever the rules of a state says it should end. A special case for this is the .cancel() call. If a state should need to be ended early for whatever reason, the Experiment will call the state’s .cancel() method and that method will setup an immediate call to both .leave() and .finalize().
.finalize() happens during RT but not until after a state has left.
This call usually happens whenever the clock has extra time, i.e. during a Wait
state. This call will save out the logs, setup callbacks to the ParentState to
tell it that this state has finished, and set self.active to false. This call
is used to clean up the state sometime after the state has run .leave().
The SMILE timing Algorithm
Write up coming soon.